Introduction
This setting modifies AUTO Mode programming to dynamically ramp up levels gradually if the temperature and humidity gets further away from your set target. You can set a transition figure for temperature triggers, and a transition figure for humidity triggers. The transition figure affects high triggers differently than low triggers. On the controller, the transition setting can be accessed by pressing the gear button until you reach transition temperature and transition humidity. This setting is only available on UIS™ Controllers.
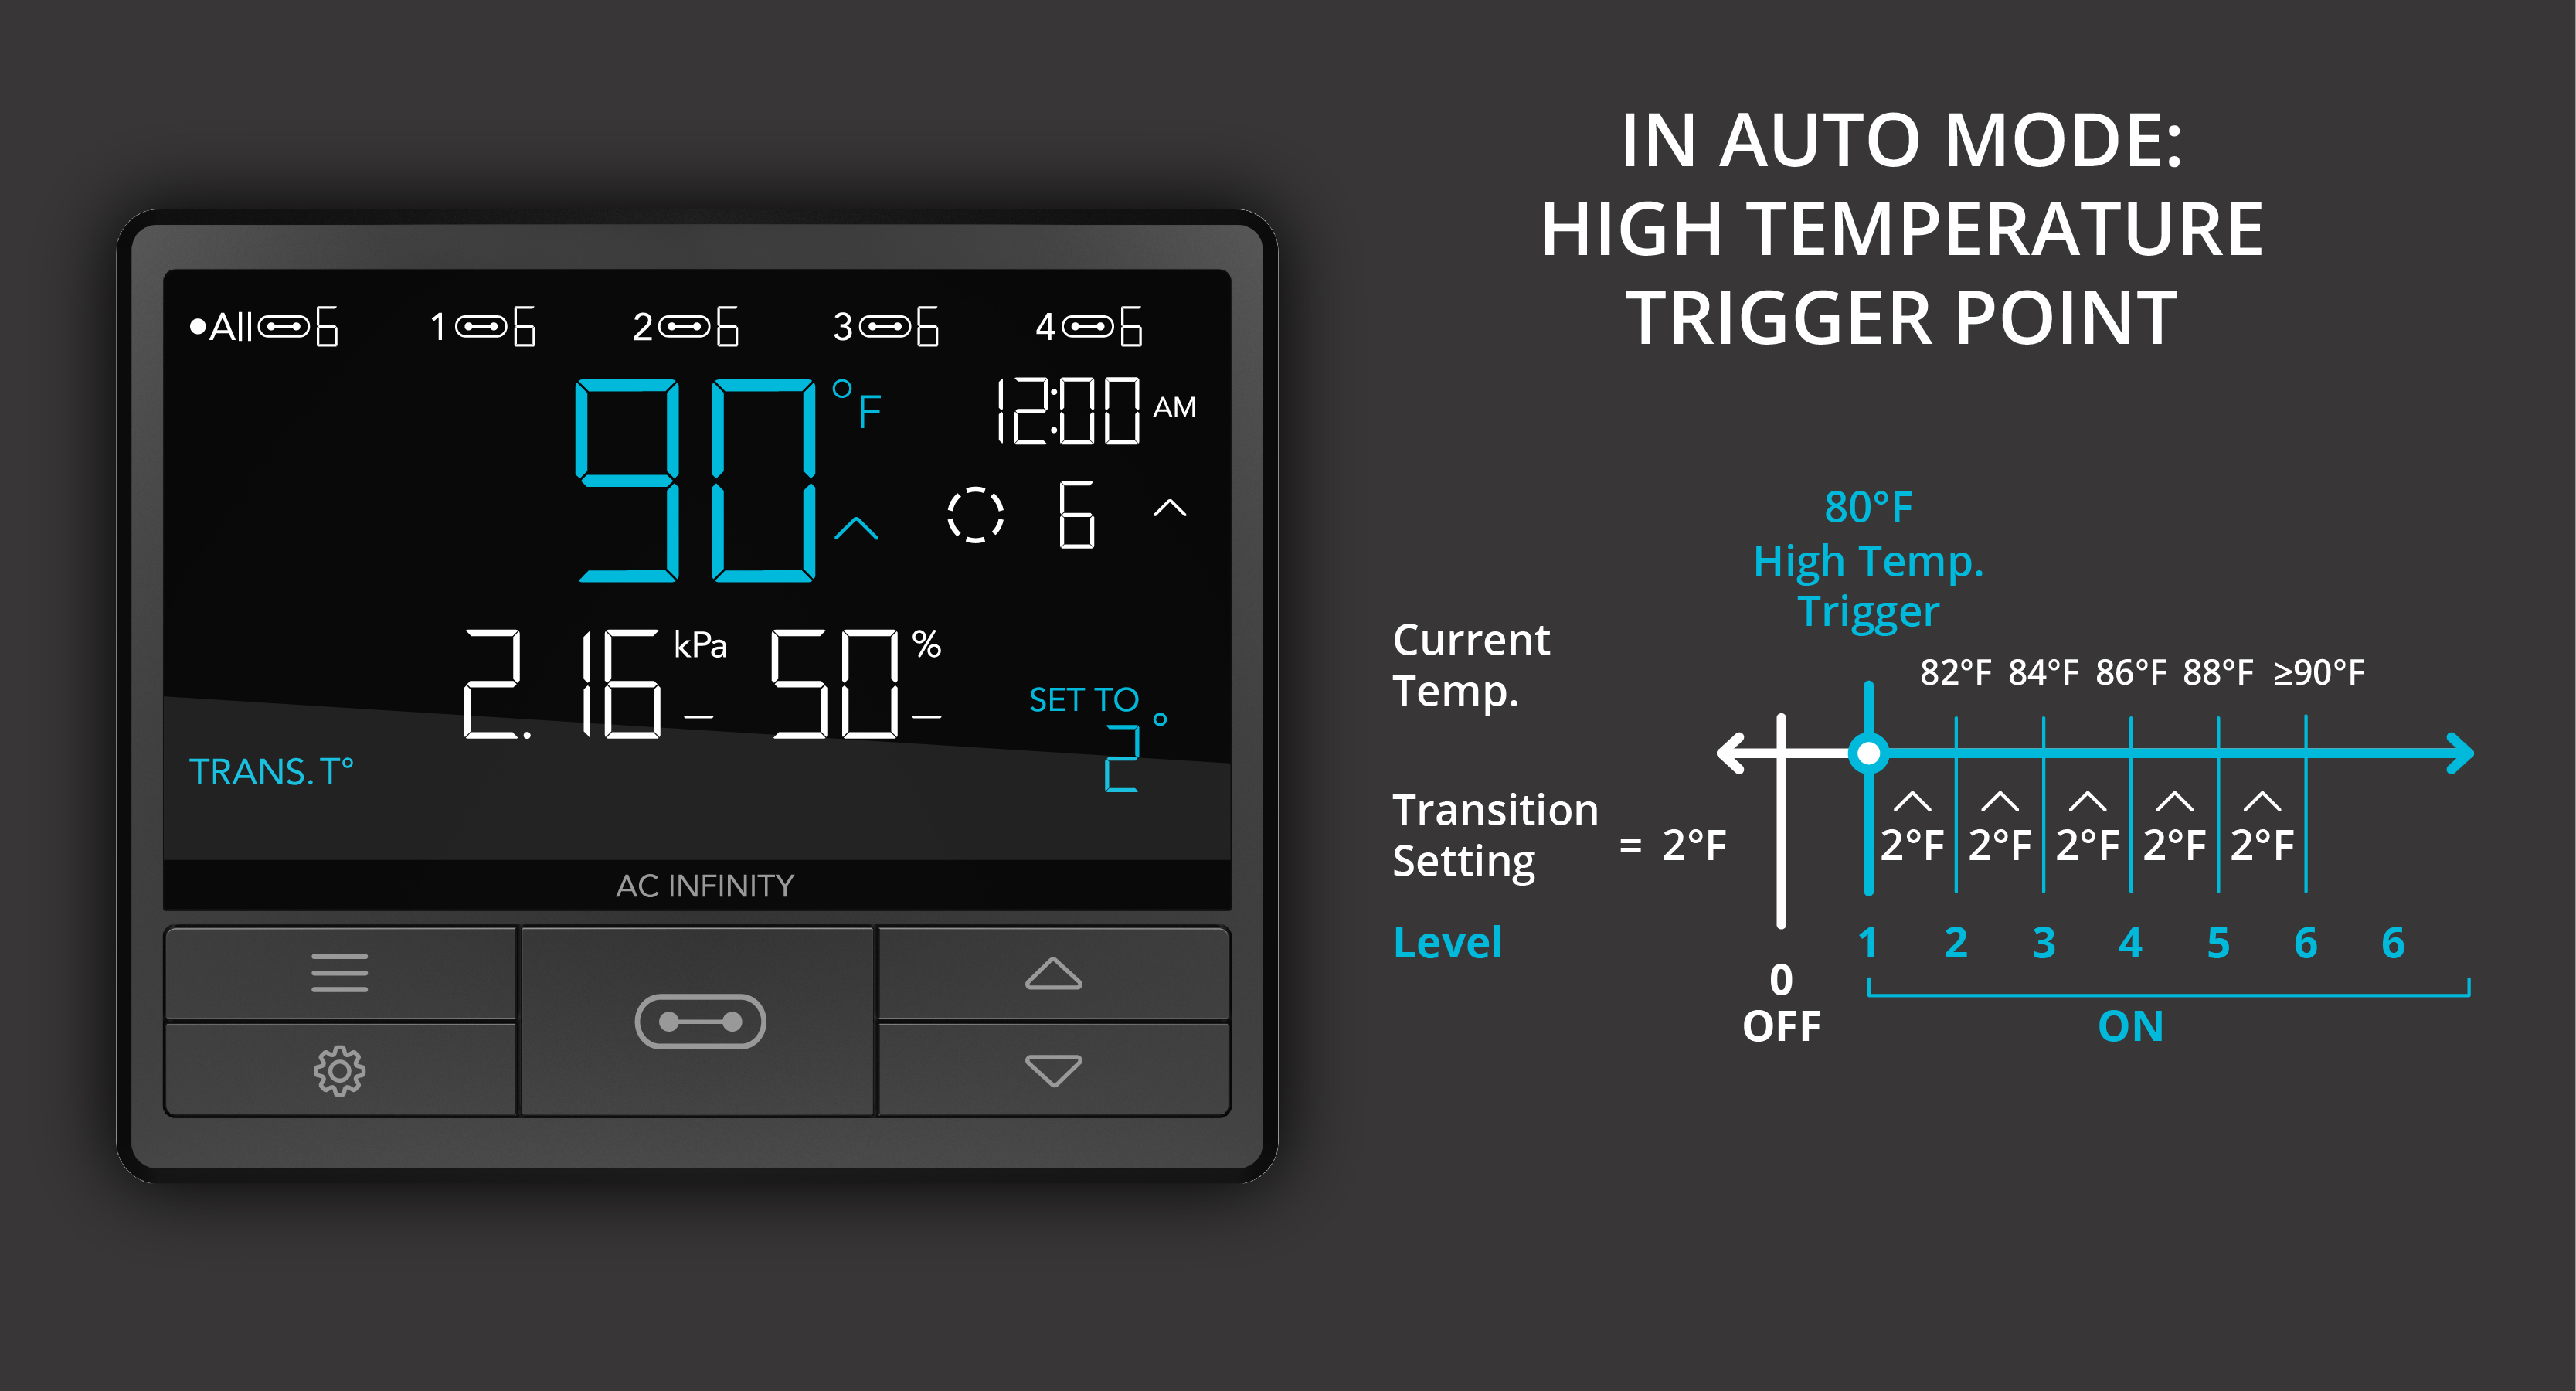
Transition For High Temperature Triggers
For high temperature triggers, the transition figure you have set will create intervals of itself above your set trigger point. Then for every interval that the temperature has risen above your high temperature trigger point, the device will increase its level by one. For example, let’s say you set the temperature transition to 2°F and you have your device set to run in AUTO mode with a High Temperature trigger set to 80°F degrees. The transition figure you had set of 2°F will create intervals of 2°F above your high temperature trigger point of 80°F. So from 80°F to 81°F, your device will run at level 1. From 82°F to 83°F, your device will run at level 2. Your device will continue increasing its level by 1 for each 2°F degree intervals it surpasses until it reaches the max level.

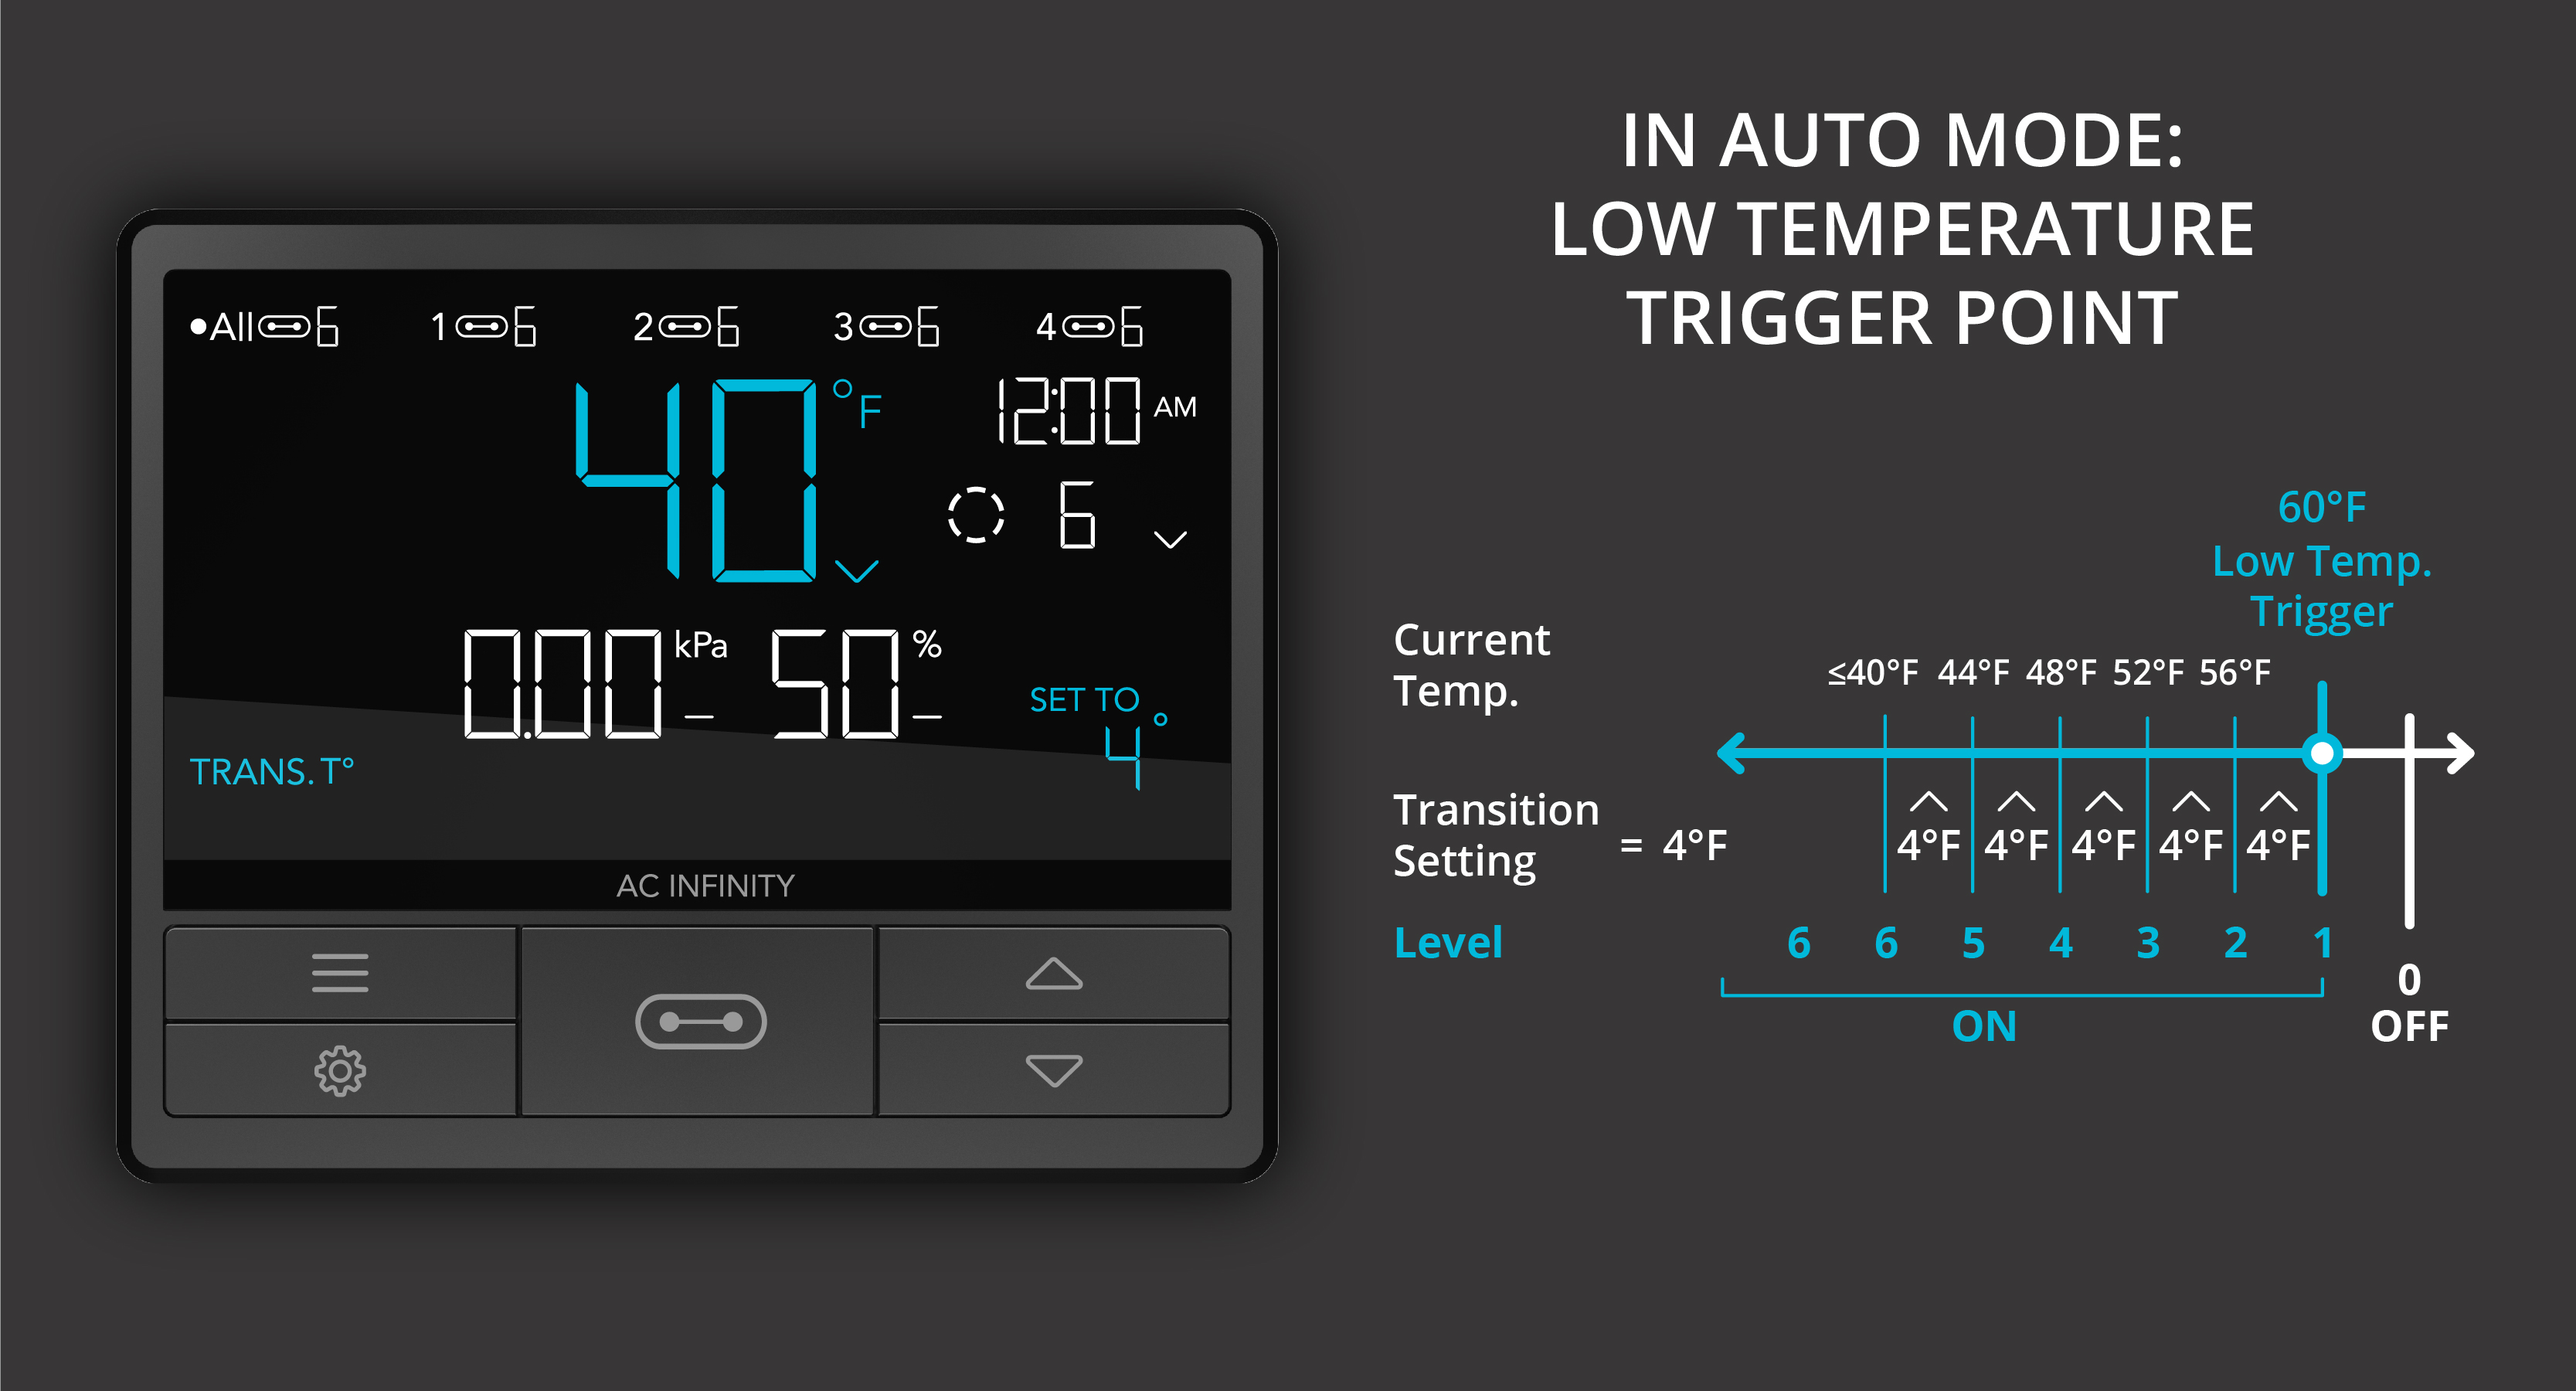
Transition For Low Temperature Triggers
For low temperature triggers, the transition figure you have set will create intervals of itself below your set trigger point. Then for every interval that the temperature has fallen below your low temperature trigger point, the device will increase its level by one. For example, let’s say you set the temperature transition to 4°F and you have your device set to run in AUTO mode with a Low Temperature trigger set to 60°F degrees. The transition figure you had set of 4°F will create intervals of 4°F below your low temperature trigger point of 60°F. So from 57°F to 60°F, your device will run at level 1. From 53°F to 56°F, your device will run at level 2. Your device will continue increasing its level by 1 for each 4°F degree intervals it drops below until it reaches the max level.

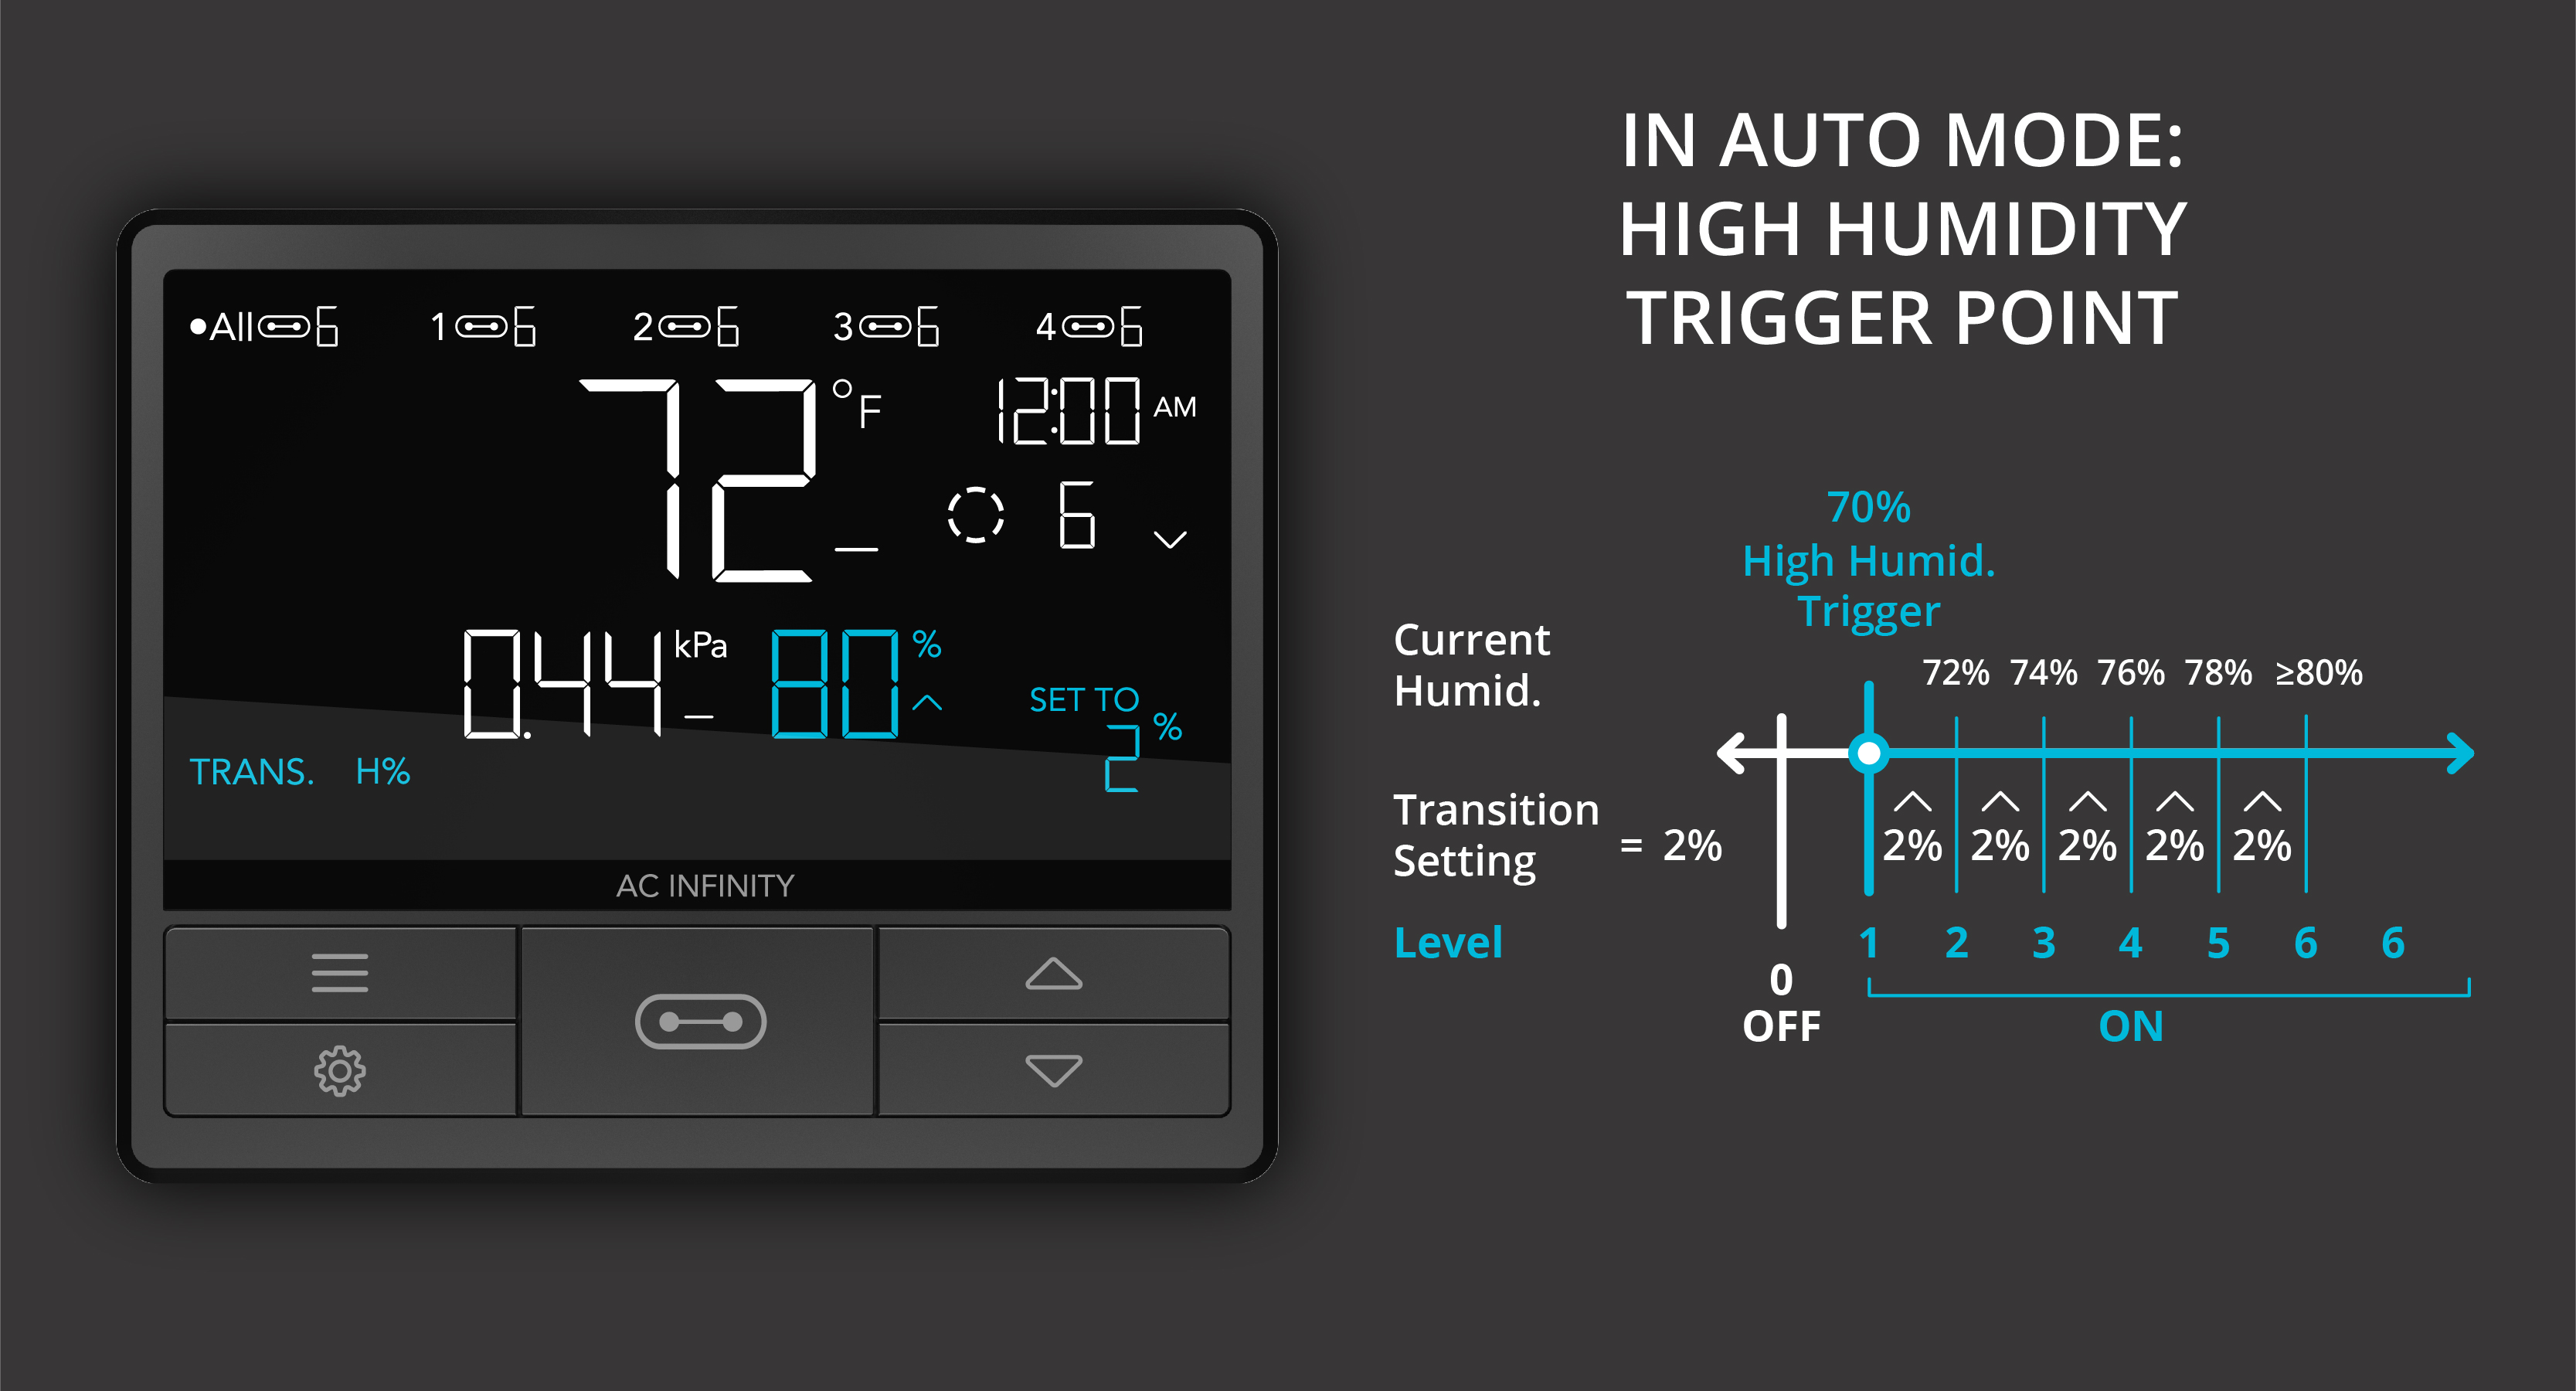
Transition For High Humidity Triggers
For high humidity triggers, the transition figure you have set will create intervals of itself above your set trigger point. Then for every interval that the humidity has risen above your high humidity trigger point, the device will increase its level by one. For example, let’s say you set the humidity transition to 2% and you have your device set to run in AUTO mode with a High Humidity trigger set to 70% relative humidity. The transition figure you had set of 2% will create intervals of 2% above your high humidity trigger point of 70%. So from 70% to 71%, your device will run at level 1. From 72% to 73%, your device will run at level 2. Your device will continue increasing its level by 1 for each 2% relative humidity intervals it surpasses until it reaches the max level.

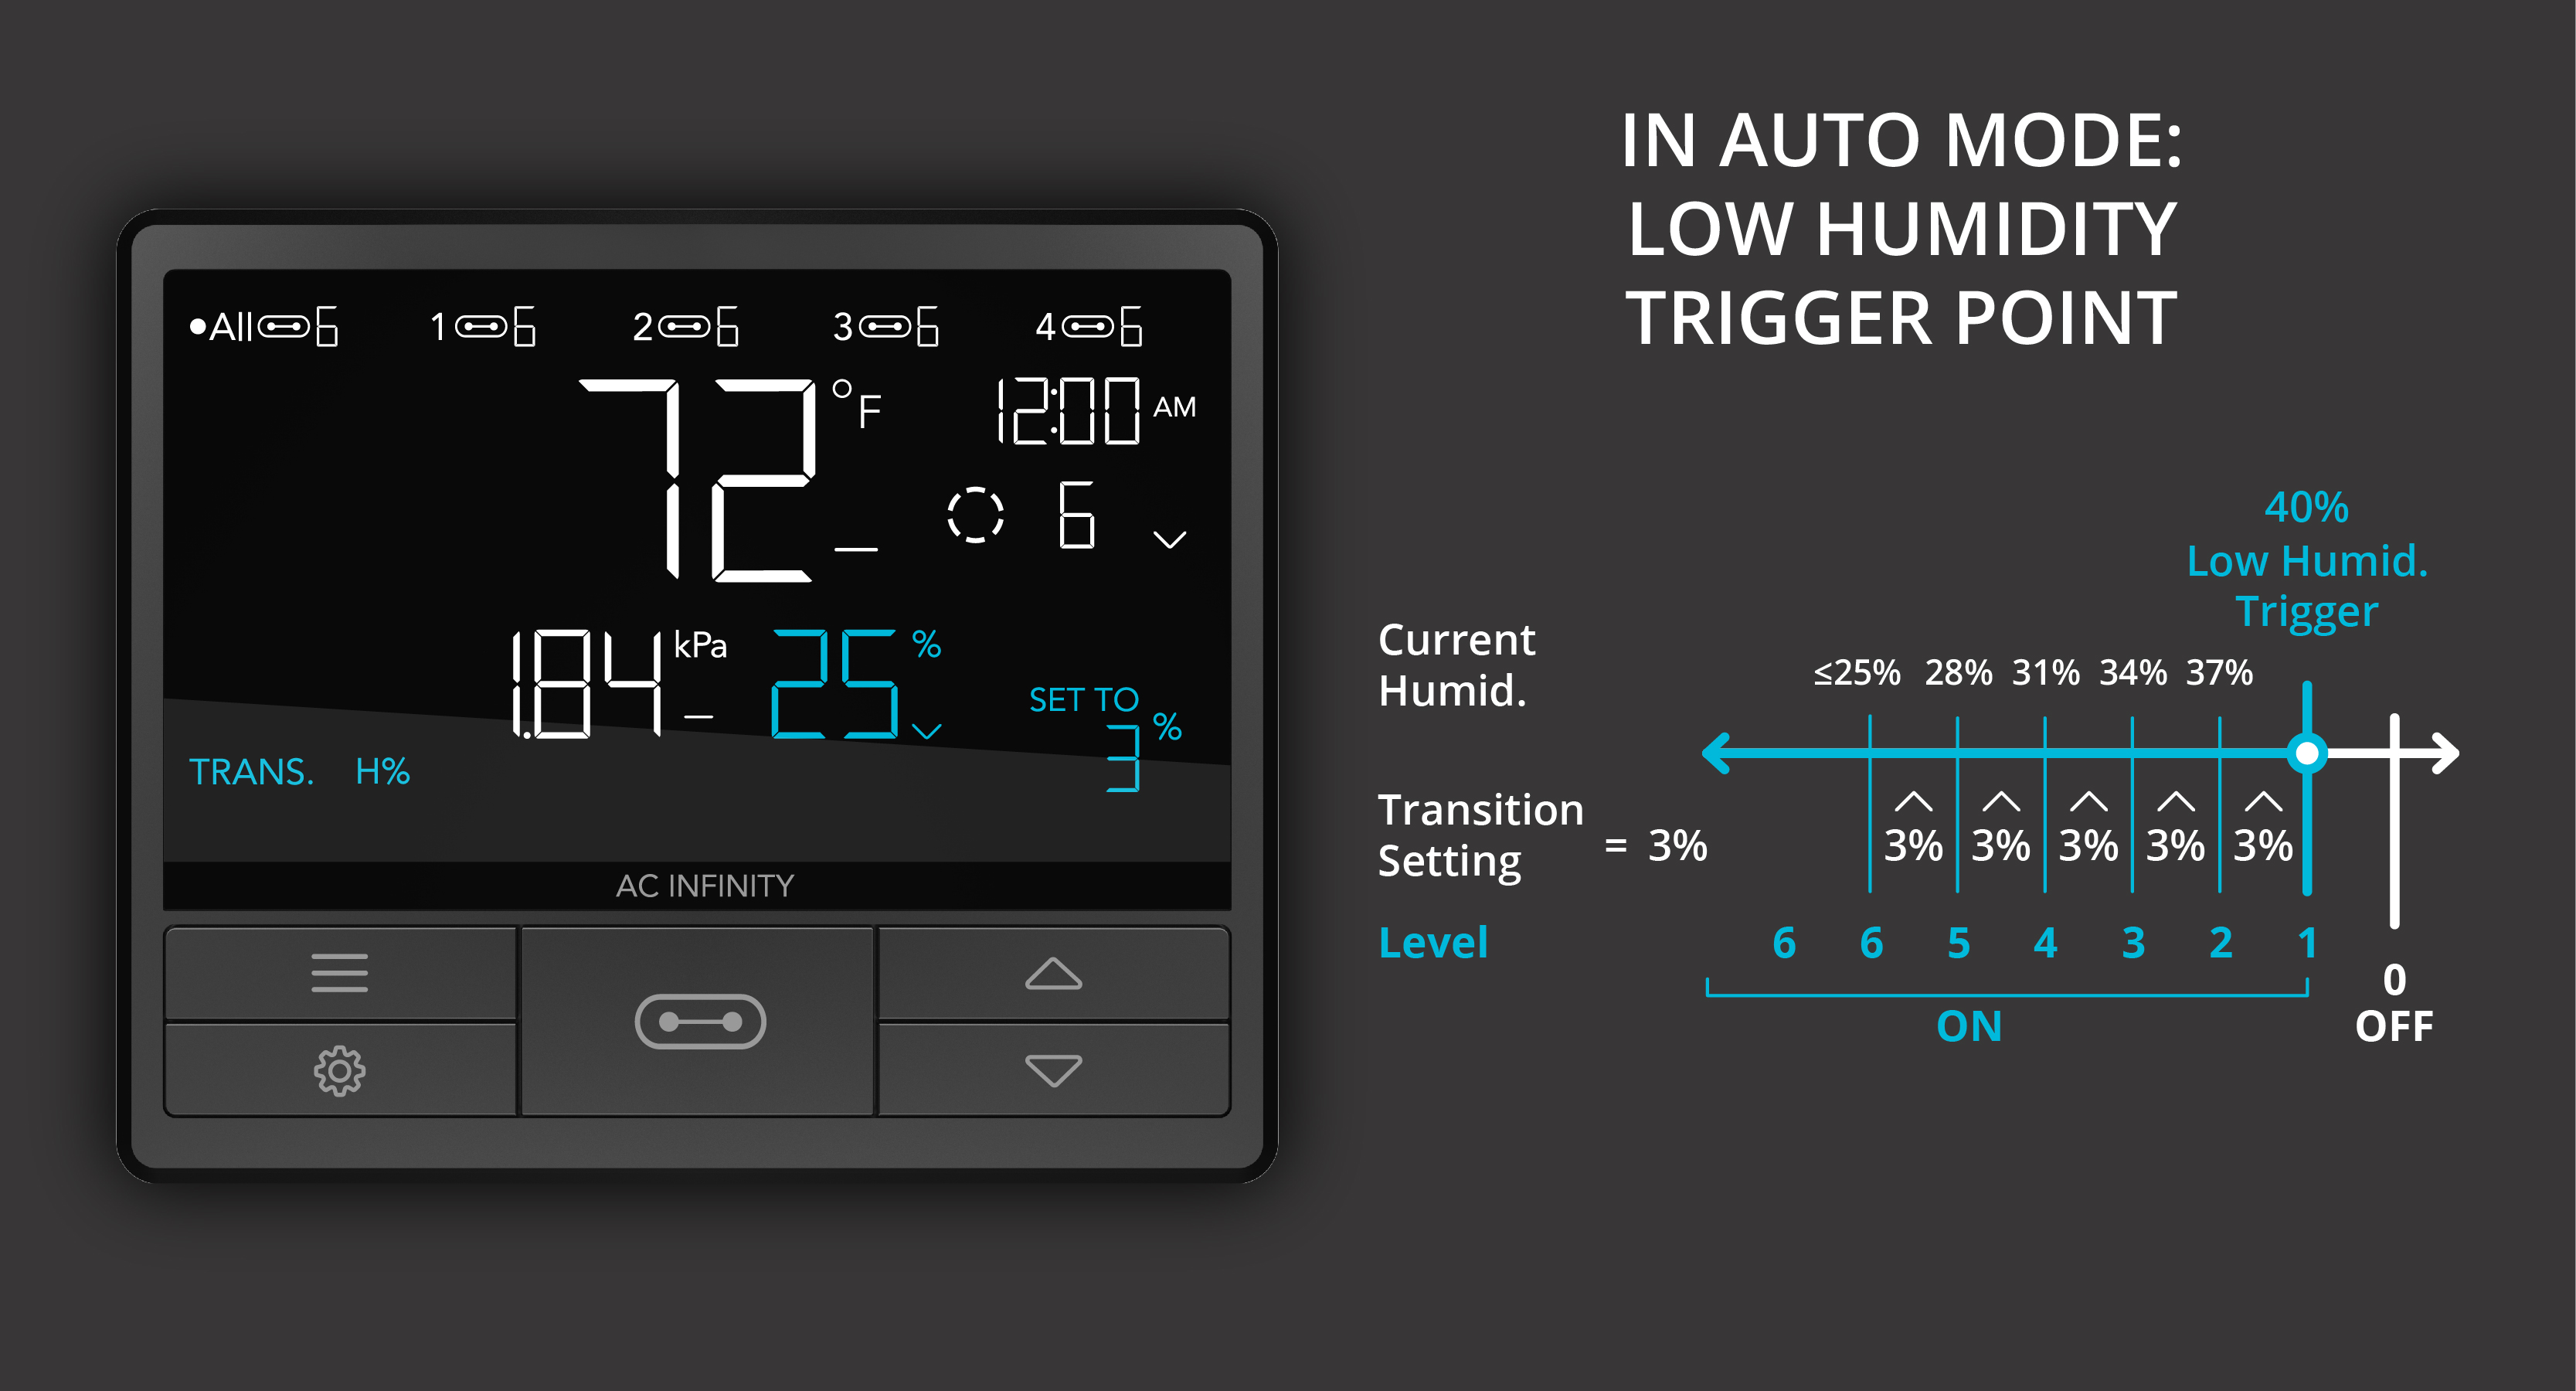
Transition For Low Humidity Triggers
For low humidity triggers, the transition figure you have set will create intervals of itself below your set trigger point. Then for every interval that humidity that has fallen below your low humidity trigger point, the device will increase its level by one. For example, let’s say you set the humidity transition to 3% and you have your device set to run in AUTO mode with a Low Humidity trigger set to 40% relative humidity. The transition figure you had set of 3% will create intervals of 3% below your high humidity trigger point of 40%. So from 38% to 40%, your device will run at level 1. From 35% to 37%, your device will run at level 2. Your device will continue increasing its level by 1 for each 3% relative humidity intervals it drops below until it reaches the max level.

Transition For High VPD Triggers (CONTROLLER 69 PRO Only)
For high VPD triggers, the transition figure you have set will create intervals of itself above your set trigger point. Then for every interval that the VPD has risen above your high VPD trigger point, the device will increase its level by one. For example, let’s say you set the VPD transition to 0.2 kPa and you have your device set to run in AUTO mode with a High VPD trigger set to 1.0 kPa. The transition figure you had set of 0.2 kPa will create intervals of 0.2 kPa above your high VPD trigger point of 1.0 kPa. So from 1.0 kPa to 1.1 kPa, your device will run at level 1. From 1.2 kPa to 1.3 kPa, your device will run at level 2. Your device will continue increasing its level by 1 for each 0.2 kPa intervals it surpasses until it reaches the max level.

Transition For Low VPD Triggers (CONTROLLER 69 PRO Only)
For low VPD triggers, the transition figure you have set will create intervals of itself below your set trigger point. Then for every interval that VPD that has fallen below your low VPD trigger point, the device will increase its level by one. For example, let’s say you set the VPD transition to 0.1 kPa and you have your device set to run in AUTO mode with a Low VPD trigger set to 0.5 kPa. The transition figure you had set of 0.1 kPa will create intervals of 0.1 kPa below your low VPD trigger point of 0.5 kPa. So from 0.41 kPa to 0.5 kPa, your device will run at level 1. From 0.31 kPa to 0.4 kPa, your device will run at level 2. Your device will continue increasing its level by 1 for each 0.1 kPa intervals it drops below until it reaches the max level.

Settings that Affect Your Programming
Maximum and Minimum Level Settings - all programming modes can be limited by these settings. When the device is triggered to be off, it will run at the minimum level you had set. When the device is triggered to be on, it will run at up to the maximum level you had set. The max and min setting is the level you had set in ON and OFF mode, respectively. Its relation to Transition Setting, is that your device will begin running at your minimum level setting and will ramp up gradually until it reaches your the maximum level setting.


